5. Data Management
One of the key features of Pegasus is it’s end to end data management of datasets tracked in your workflow. Pegasus is responsible for selecting the best replica for your inputs, transferring them to a location where jobs in your workflow can access them, cleaning up datasets no longer required as the workflow runs, to staging out and registering the generated outputs to locations of your choosing. Majority of the data management optimizations occur during the mapping phase , where the input Abstract Workflow in converted to an Executable Workflow that can be executed on your target infrastructure.
This chapter provides details of all data management capabilities in Pegasus.
5.1. Replica Selection
Each job in the Abstract Workflow maybe associated with input LFN’s denoting the files that are required for the job to run. To determine the physical replica (PFN) for a LFN, Pegasus queries the Replica catalog to get all the PFN’s (replicas) associated with a LFN. The Replica Catalog may return multiple PFN’s for each of the LFN’s queried. Hence, Pegasus needs to select a single PFN amongst the various PFN’s returned for each LFN. This process is known as replica selection in Pegasus. Users can specify the replica selector to use in the properties file.
This document describes the various Replica Selection Strategies in Pegasus.
5.1.1. Configuration
The user properties determine what replica selector Pegasus Workflow Mapper uses. The property pegasus.selector.replica is used to specify the replica selection strategy. Currently supported Replica Selection strategies are
Default
Regex
Restricted
Local
The values are case sensitive. For example the following property setting will throw a Factory Exception .
pegasus.selector.replica default
The correct way to specify is
pegasus.selector.replica Default
5.1.2. Supported Replica Selectors
The various Replica Selectors supported in Pegasus Workflow Mapper are explained below.
Note
Starting 4.6.0 release the Default and Regex Replica Selectors return an ordered list with priorities set. pegasus-transfer at runtime will failover to alternate url’s specified, if a higher priority source URL is inaccessible.
5.1.2.1. Default
This is the default replica selector used in the Pegasus Workflow Mapper. If the property pegasus.selector.replica is not defined in properties, then Pegasus uses this selector.
The selector orders the various candidate replica’s according to the following rules
valid file URL’s . That is URL’s that have the site attribute matching the site where the executable pegasus-transfer is executed.
all URL’s from preferred site (usually the compute site)
all other remotely accessible ( non file) URL’s
To use this replica selector set the following property
pegasus.selector.replica Default
5.1.2.2. Regex
This replica selector allows the user to specific regular expressions that can be used to rank various PFN’s returned from the Replica Catalog for a particular LFN. This replica selector orders the replicas based on the rank. Lower the rank higher the preference.
The regular expressions are assigned different rank, that determine the order in which the expressions are employed. The rank values for the regex can expressed in user properties using the property.
pegasus.selector.replica.regex.rank.[value] regex-expression
The [value] in the above property is an integer value that denotes the rank of an expression with a rank value of 1 being the highest rank.
For example, a user can specify the following regex expressions that will ask Pegasus to prefer file URL’s over gsiftp url’s from example.isi.edu
pegasus.selector.replica.regex.rank.1                       file://.*
pegasus.selector.replica.regex.rank.2                       gsiftp://example\.isi\.edu.*
User can specify as many regex expressions as they want.
Since Pegasus is in Java , the regex expression support is what Java supports. It is pretty close to what is supported by Perl. More details can be found at http://java.sun.com/j2se/1.5.0/docs/api/java/util/regex/Pattern.html
Before applying any regular expressions on the PFN’s for a particular LFN that has to be staged to a site X, the file URL’s that don’t match the site X are explicitly filtered out.
To use this replica selector set the following property
pegasus.selector.replica Regex
5.1.2.3. Restricted
This replica selector, allows the user to specify good sites and bad sites for staging in data to a particular compute site. A good site for a compute site X, is a preferred site from which replicas should be staged to site X. If there are more than one good sites having a particular replica, then a random site is selected amongst these preferred sites.
A bad site for a compute site X, is a site from which replicas should not be staged. The reason of not accessing replica from a bad site can vary from the link being down, to the user not having permissions on that site’s data.
The good | bad sites are specified by the following properties
pegasus.replica.*.prefer.stagein.sites
pegasus.replica.*.ignore.stagein.sites
where the * in the property name denotes the name of the compute site. A * in the property key is taken to mean all sites. The value to these properties is a comma separated list of sites.
For example the following settings
pegasus.selector.replica.*.prefer.stagein.sites            usc
pegasus.replica.uwm.prefer.stagein.sites                   isi,cit
means that prefer all replicas from site usc for staging in to any compute site. However, for uwm use a tighter constraint and prefer only replicas from site isi or cit. The pool attribute associated with the PFN’s tells the replica selector to what site a replica/PFN is associated with.
The pegasus.replica.*.prefer.stagein.sites property takes precedence over pegasus.replica.*.ignore.stagein.sites property i.e. if for a site X, a site Y is specified both in the ignored and the preferred set, then site Y is taken to mean as only a preferred site for a site X.
To use this replica selector set the following property
pegasus.selector.replica Restricted
5.1.2.4. Local
This replica selector always prefers replicas from the local host ( pool attribute set to local ) and that start with a file: URL scheme. It is useful, when users want to stagein files to a remote site from the submit host using the Condor file transfer mechanism.
To use this replica selector set the following property
pegasus.selector.replica Local
5.2. Supported Transfer Protocols
Pegasus refers to a python script called pegasus-transfer as the executable in the transfer jobs to transfer the data. pegasus-transfer looks at source and destination url and figures out automatically which underlying client to use. pegasus-transfer is distributed with the PEGASUS and can be found at $PEGASUS_HOME/bin/pegasus-transfer.
Currently, pegasus-transfer interfaces with the following transfer clients
Transfer Client |
Used For |
|---|---|
gfal-copy |
staging file to and from GridFTP servers |
globus-url-copy |
staging files to and from GridFTP servers, only if gfal is not detected in the path. |
globus |
staging files between globus endpoints using the globus transfer service |
gfal-copy |
staging files to and from SRM or XRootD servers |
wget |
staging files from a HTTP server |
cp |
copying files from a POSIX filesystem |
ln |
symlinking against input files |
pegasus-s3 |
staging files to and from S3 buckets in Amazon Web Services, Open Storage Network (OSN) |
gsutil |
staging files to and from Google Storage buckets |
scp |
staging files using scp |
gsiscp |
staging files using gsiscp and X509 |
iget |
staging files to and from iRODS servers |
htar |
to retrieve input files from HPSS tape storage |
docker |
to pull images from Docker hub |
singularity |
to pull images from Singularity hub and Singularity library (Sylabs Cloud) |
curl |
staging files from a Webdav server |
For remote sites, Pegasus constructs the default path to pegasus-transfer on the basis of PEGASUS_HOME env profile specified in the site catalog. To specify a different path to the pegasus-transfer client , users can add an entry into the transformation catalog with fully qualified logical name as pegasus::pegasus-transfer
5.2.1. Amazon S3 (s3://)
Pegasus can be configured to use Amazon S3 as a staging site. In this mode, Pegasus transfers workflow inputs from the input site to S3. When a job runs, the inputs for that job are fetched from S3 to the worker node, the job is executed, then the output files are transferred from the worker node back to S3. When the jobs are complete, Pegasus transfers the output data from S3 to the output site.
In order to use S3, it is necessary to create a config file for the S3 transfer client, pegasus-s3. You also need to specify S3 as a staging site.
Next, you need create a Pegasus credentials files. See the section on credential staging. This file is picked up automatically when your workflow contains s3 transfers.
5.2.2. Open Storage Network OSN (osn://)
Pegasus can be configured to use buckets in Open Storage Network (OSGN) as a staging site. OSN provides a S3 compatible interface to retrieve and put files in a bucket.
In order to use S3, it is necessary to create a config file for the S3 transfer client, pegasus-s3. You also need to specify S3 as a staging site.
Next, you need create a Pegasus credentials files. See the section on credential staging. This file is picked up automatically when your workflow contains OSN transfers. Please add a section in it describing your endpoint. For example to use OSN deployment at XSEDE.
[osn]
endpoint = https://sdsc.osn.xsede.org

[joe@osn]
access_key = XXXXXXXXXXXXXXXXXXXXXXXXXXXXXXXX
secret_key = abababababababababababababababab
To associate OSN as a staging area for your condorpool site, you can associate shared scratch directory to be a bucket in OSN
from Pegasus.api import *

sc = SiteCatalog()
condorpool = Site("condorpool", arch=Arch.X86_64, os_type=OS.LINUX)

# create and add a bucket in OSN to use for your workflows
condorpool_shared_scratch_dir = Directory(Directory.SHARED_SCRATCH, path="/asc190064-bucket01/pegasus-workflows") \
    .add_file_servers(
    FileServer("s3://joe@osn/asc190064-bucket01/pegasus-workflows/", Operation.ALL),
)
condorpool.add_directories(condorpool_shared_scratch_dir)
condorpool.add_pegasus_profiles(style="condor")
sc.add_sites(condorpool)
pegasus: '5.0'
siteCatalog:
  sites:
  - name: condorpool
    arch: x86_64
    os.type: linux
    directories:
    - type: sharedScratch
      path: /asc190064-bucket01/pegasus-workflows/
      sharedFileSystem: false
      fileServers:
      - url: s3://joe@osn/asc190064-bucket01/pegasus-workflows
        operation: all
    profiles:
      pegasus:
        style: condor
Note
The OSN endpoint is defined in the credentials.conf and in the URL’s in the site catalog, you refer it with the alias. In this example that is osn
5.2.3. Docker (docker://)
Container images can be pulled directly from Docker Hub using Docker URLs. Example: docker://pegasus/osg-el7
Example: docker://pegasus/osg-el7
Only public images are supported at this time.
5.2.4. File / Symlink (file:// , symlink://)
5.2.5. Globus Transfers (go://)
Globus offers a transfer service with features such as policy based connection management and automatic failure detection and recovery. Pegasus has limited support for Globus transfers.
If you want to use Globus transfers in your workflow, all data has to be accessible via Globus collections. You cannot mix Globus transfers with other protocols. For most users, this means they will have to create an endpoint for their submit host, expose their data via a collection and modify both the replica catalog and Abstract Workflow generator so that all URLs in the workflow are referencing the relevant Globus collections.
The Globus service offers high security assurance and as such users and applications are required to authenticate themselves. To support Globus transfers, Pegasus workflows use OAuth tokens, provided by the Globus Auth service, in order to authenticate themselves and use the Globus API to instantiate transfers between collections.
Using pegasus-globus-online-init, a user can provide authorization to Pegasus
to retrieve a valid transfer access tokens. By default Pegasus acquires
temporary tokens that expire within a few days. Using –permanent
option you can request refreshable tokens that last until the token’s session expires
(or until access is revoked).
With endpoints running Globus Connect Server(GCS) versions 5.4+ data collections
may require data_access consent to allow to operate on them (e.g., transfers).
To acquire data_access consent for these collections under pegasus,
you can use the --collections option and list the UUIDs of the collections
you would like to give pegasus consent for.
Additionally some endpoints have enabled the High Assurance setting which
requires users and tokens to be authenticated under specific domains.
For example, OLCF DTN is one of the endpoints requiring domain authentication.
To acquire a domain authenticated token you can use the --domains option and list
the domains required.
Let’s assume that a workflow requires to transfer data between NERSC and OLCF. NERSC has enabled the data_access consent while OLCF has enabled the high assurance domain requirements. NERSC DTN’s collection UUID is 9d6d994a-6d04-11e5-ba46-22000b92c6ec and OLCF DTN’s domain requirement is sso.ccs.ornl.gov. To request a valid token one can use the following invocation of pegasus-globus-online-init and follow the steps.
pegasus-globus-online-init --collections 9d6d994a-6d04-11e5-ba46-22000b92c6ec --domains sso.ccs.ornl.gov
Note
For domain authenticated tokens it is not advised to request a refreshable token with the -p option. The number of days the token can be used is dictated by the policies of the domain authentication. Endpoints, such as OLCF, require re-authentication of the token every few days. As a result, pegasus-globus-online-init should be invoked frequently to avoid transfer failures.
URLs for data in Globus collections follow the scheme: go://[collection_uuid]/[path]. For example, a user named bsmith, that wants to use the NERSC DTN Globus collection to transfer a file with absolute path /global/homes/p/bsmith/1.dat, the Globus URL would be: go://9d6d994a-6d04-11e5-ba46-22000b92c6ec/global/homes/p/bsmith/1.dat.
5.2.6. GridFTP (gsiftp://)
5.2.6.1. Preference of GFAL over GUC
JGlobus is no longer actively supported and is not in compliance with RFC 2818 . As a result cleanup jobs using pegasus-gridftp client would fail against the servers supporting the strict mode. We have removed the pegasus-gridftp client and now use gfal clients as globus-url-copy does not support removes. If gfal is not available, globus-url-copy is used for cleanup by writing out zero bytes files instead of removing them.
If you want to force globus-url-copy to be preferred over GFAL, set the PEGASUS_FORCE_GUC=1 environment variable in the site catalog for the sites you want the preference to be enforced. Please note that we expect globus-url-copy support to be completely removed in future releases of Pegasus due to the end of life of Globus Toolkit (see announcement).
5.2.7. GridFTP over SSH (sshftp://)
Instead of using X.509 based security, newer version of Globus GridFTP can be configured to set up transfers over SSH. See the Globus Documentation for details on installing and setting up this feature.
Pegasus requires the ability to specify which SSH key to be used at runtime, and thus a small modification is necessary to the default Globus configuration. On the hosts where Pegasus initiates transfers (which depends on the data configuration of the workflow), please replace gridftp-ssh, usually located under /usr/share/globus/gridftp-ssh, with:
#!/bin/bash

url_string=$1
remote_host=$2
port=$3
user=$4

port_str=""
if  [ "X" = "X$port" ]; then
    port_str=""
else
    port_str=" -p $port "
fi

if  [ "X" != "X$user" ]; then
    remote_host="$user@$remote_host"
fi

remote_default1=.globus/sshftp
remote_default2=/etc/grid-security/sshftp
remote_fail="echo -e 500 Server is not configured for SSHFTP connections.\\\r\\\n"
remote_program=$GLOBUS_REMOTE_SSHFTP
if  [ "X" = "X$remote_program" ]; then
    remote_program="(( test -f $remote_default1 && $remote_default1 ) || ( test -f $remote_default2 && $remote_default2 ) || $remote_fail )"
fi

if [ "X" != "X$GLOBUS_SSHFTP_PRINT_ON_CONNECT" ]; then
    echo "Connecting to $1 ..." >/dev/tty
fi

# for pegasus-transfer
extra_opts=" -o StrictHostKeyChecking=no"
if [ "x$SSH_PRIVATE_KEY" != "x" ]; then
    extra_opts="$extra_opts -i $SSH_PRIVATE_KEY"
fi

exec /usr/bin/ssh $extra_opts $port_str $remote_host $remote_program
Once configured, you should be able to use URLs such as sshftp://username@host/foo/bar.txt in your workflows.
5.2.8. Google Storage (gs://)
5.2.9. HTTP (http:// , https://)
5.2.10. HPSS (hpss://)
We support retrieval of input files from a tar file in HPSS storage using the htar command. The naming convention to describe the tar file and the file to retrieve fro the tar file is as follows
hpss:///some-name.tar/path/in-tar-to/file.txt
For example: for e.g hpss:///test.tar/set1/f.a
For efficient retrieval pegasus-transfer bin’s all the hpss transfers in the .in file
fiirst by the tar file and then
the destination directory.
Binning by destination directory is done to support deep LFN’s. Also thing to note is that htar command returns success even if a file does not exist in the archive. pegasus-transfer tries to make sure after the transfer that the destination file exists and is readable.
HPSS requires a token to generated for retrieval. Information on how to specify the token location can be found here.
5.2.11. iRODS (irods://)
iRODS can be used as a input data location, a storage site for intermediate data during workflow execution, or a location for final output data. Pegasus uses a URL notation to identify iRODS files. Example:
irods://some-host.org/path/to/file.txt
The path to the file is relative to the internal iRODS location. In the example above, the path used to refer to the file in iRODS is path/to/file.txt (no leading /).
See the section on credential staging for information on how to set up an irodsEnv file to be used by Pegasus.
5.2.12. Open Science Data Federation (OSDF) / stashcp (osdf:// stash://)
Open Science Grid provides a data service called OSDF, and the command line tool pelican for interacting with the OSDF endpoints. An example on how to set up the site catalog and URLs can be found in the OSG User Support Pegasus tutorial
Starting 5.1.2 release, OSDF transfers are now always delagated to HTCondor to manage using HTCondor file IO, especially when turning on Bypass Input File Staging. This applicable both for condorio and nonsharedfs data configurations.
Additionally, when using OSDF as a staging site in the nonsharedfs mode, PegasusLite jobs are setup to rely on HTCondor file transfers to stage-in and stage-out the data to OSDF endpoints from the job execution directory.
5.2.13. SCP (scp://)
5.2.14. Singularity (<shub | library>://)
Container images can be pulled directly from Singularity hub and Singularity library depending on the version of Singularity installed on a node requiring the container image. Singularity hub images require at least Singularity v2.3, while Singularity library images require at least Singularity v3.0.
Example: shub://vsoch/singularity-images
Example: library://sylabsed/examples/lolcow
Only public images are supported at this time.
5.2.15. WebDAV (webdav://, webdavs://)
Authenticated WebDAV transfers uses the credential staging file. Please add a section in it describing your endpoint. For example:
[data.cyverse.org] username = myname password = abc123
5.3. Credentials Management
Pegasus tries to do data staging from localhost by default, but some data scenarios makes some remote jobs do data staging. An example of such a case is when running in nonsharedfs mode. Depending on the transfer protocols used, the job may have to carry credentials to enable these data transfers. To specify where which credential to use and where Pegasus can find it, use environment variable profiles in your site catalog. The supported credential types are X.509 grid proxies, Amazon AWS S3 keys, Google Cloud Platform OAuth token (.boto file), iRods password and SSH keys.
Credentials are usually associated per site in the site catalog. Users can associate the credentials either as a Pegasus profile or an environment profile with the site.
A pegasus profile with the value pointing to the path to the credential on the local site or the submit host. If a pegasus credential profile associated with the site, then Pegasus automatically transfers it along with the remote jobs.
A env profile with the value pointing to the path to the credential on the remote site. If an env profile is specified, then no credential is transferred along with the job. Instead the job’s environment is set to ensure that the job picks up the path to the credential on the remote site.
In case of data transfer jobs, it is possible to associate different credentials for a single file transfer ( one for the source server and the other for the destination server) . For example, when leveraging GridFTP transfers between two sides that accept different grid credentials such as XSEDE Stampede site and NCSA Bluewaters. In that case, Pegasus picks up the associated credentials from the site catalog entries for the source and the destination sites associated with the transfer.
5.3.1. ~/.pegasus/credentials.conf
Pegasus has a generic credentials file located under
~/.pegasus/credentials.conf. This file is currently used for
WebDAV and S3 transfers, but more protocols will probably be moved
to this model in the future. To get started, create
~/.pegasus/credentials.conf and ensure the file is only
readable by the current user:
$ chmod 600 ~/.pegasus/credentials.conf
The format of the file is following the Python INI format where the section headers refer to a storage system. For basic protocols, the section name is the hostname, and for clouds, it is just an arbitrary name with an endpoint entry. Example:
# For simple username/password protocols, such as WebDAV,
# just specify the hostname and credentials. In this
# example, the credentials would be used for URLs
# matching the section, such as
# webdav://data.cyverse.org/some/file.txt

[data.cyverse.org]

username = joe
password = secretsauce1

# For S3 access, you can create an entry for the cloud
# specific options, and then one or more user specific
# entries with a key @ matching the cloud one (for
# example, [amazon] and [joe@amazon] below)
# Refer to https://docs.aws.amazon.com/general/latest/gr/s3.html
# for a mapping of amazon endpoints to regions.
# It is highly recommended that you specify the amazon
# region key in the amazon section that is consisten with
# the endpoint.

[amazon]
endpoint = https://s3.us-west-2.amazonaws.com/
region    = us-west-2

[joe@amazon]
access_key = 90c4143642cb097c88fe2ec66ce4ad4e
secret_key = abababababababababababababababab

# For Open Storage Network (OSN) access. OSN provides
# S3 like compatible interface to get and put files
[osn]
endpoint = https://sdsc.osn.xsede.org

[joe@osn]
access_key = XXXXXXXXXXXXXXXXXXXXXXXXXXXXXXXX
secret_key = abababababababababababababababab

# If you want to retrieve protected data using a token
# from a HTTP server. For example from a private GitHub
# or GitLab repository, you can specify the private token
# that is passed through as a header when retrieving the data
# using curl or wget.

[https://example.isi.edu]
header.Private-Token=XXXXYYYYXXXX
The ~/.pegasus/credentials.conf file will be picked up
automatically by the planner and sent with the job in case
the credentials are needed.
5.3.2. HTTP Private Tokens
Pegasus allows for you to list a private token and other http headers for retrieving data from a HTTP server in the pegasus credentials file. The credentials file gets associated with a job only if Pegasus determines that the HTTP server URL prefix is listed in the credentials file.
In the example below; if a job retrieves data frm https://example.isi.edu will have a credentials file associated with it. However, a job retrieving data from https://data.isi.edu will not have the credentials file associated with it.
# If you want to retrieve protected data using a token
# from a HTTP server. For example from a private GitHub
# or GitLab repository, you can specify the private token
# that is passed through as a header when retrieving the data
# using curl or wget.

[https://example.isi.edu]
header.Private-Token=XXXXYYYYXXXX
5.3.3. X.509 Grid Proxies
If the grid proxy is required by transfer jobs, and the proxy is in the
standard location, Pegasus will pick the proxy up automatically. For
non-standard proxy locations, you can use the X509_USER_PROXY
environment variable. Site catalog example:
<profile namespace="pegasus" key="X509_USER_PROXY" >/some/location/x509up</profile>
5.3.4. Google Storage
If a workflow is using gs:// URLs, Pegasus needs access to a Google Storage service account. First generate the credential by following the instructions at:
https://cloud.google.com/storage/docs/authentication#service_accounts
Download the credential in PKCS12 format, and then use “gsutil config -e” to generate a .boto file. For example:
$ gsutil config -e
This command will create a boto config file at /home/username/.boto
containing your credentials, based on your responses to the following
questions.
What is your service account email address? some-identifier@developer.gserviceaccount.com
What is the full path to your private key file? /home/username/my-cred.p12
What is the password for your service key file [if you haven't set one
explicitly, leave this line blank]?

Please navigate your browser to https://cloud.google.com/console#/project,
then find the project you will use, and copy the Project ID string from the
second column. Older projects do not have Project ID strings. For such projects,
click the project and then copy the Project Number listed under that project.

What is your project-id? your-project-id

Boto config file "/home/username/.boto" created. If you need to use a
proxy to access the Internet please see the instructions in that file.
Pegasus has to be told where to find both the .boto file as well as the
PKCS12 file. For the files to be picked up by the workflow, set the
BOTO_CONFIG and GOOGLE_PKCS12 profiles for the storage site.
Site catalog example:
<profile namespace="pegasus" key="BOTO_CONFIG" >/home/user/.boto</profile>
<profile namespace="pegasus" key="GOOGLE_PKCS12" >/home/user/.google-service-account.p12</profile>
5.3.5. iRods Password and Tickets
If a workflow is using iRods URLs, Pegasus has to be given an irods_environment.json file. It is a standard file, with the addtion of an password attribute, and optionally one for the ticket strong. Example:
{
    "irods_host": "some.host.edu",
    "irods_port": 1247,
    "irods_user_name": "someuser",
    "irods_zone_name": "somezone",
    "irodsPassword" : "somesecretpassword"
}
The irodsPassword is a required attribute when using iRods in
Pegasus. There is also an optional attribute for passing iRods tickets,
called irodsTicket. Please note that the the password one is still
needed, even when using tickets. Example:
{
    "irods_host": "some.host.edu",
    "irods_port": 1247,
    "irods_user_name": "someuser",
    "irods_zone_name": "somezone",
    "irodsPassword" : "somesecretpassword"
    "irodsPassword" : "someticket"
}
The location of the file can be given to the workflow using the
IRODS_ENVIRONMENT_FILE environment profile. Site catalog example:
<profile namespace="pegasus" key="IRODS_ENVIRONMENT_FILE" >${HOME}/.irods/irods_environment.json</profile>
5.3.6. SSH Keys
New in Pegasus 4.0 is the support for data staging with scp using ssh public/private key authentication. In this mode, Pegasus transports a private key with the jobs. The storage machines will have to have the public part of the key listed in ~/.ssh/authorized_keys.
Warning
SSH keys should be handled in a secure manner. In order to keep your personal ssh keys secure, It is recommended that a special set of keys are created for use with the workflow. Note that Pegasus will not pick up ssh keys automatically. The user will have to specify which key to use with
SSH_PRIVATE_KEY.
The location of the ssh private key can be specified with the
SSH_PRIVATE_KEY environment profile. Site catalog example:
<profile namespace="pegasus" key="SSH_PRIVATE_KEY" >/home/user/wf/wfsshkey</profile>
5.3.7. HPSS Tokens
You need to logon to the remote system and generate a token that is required by htar for retrieving files from HPSS.
To pass the location of the credential you can associate an environment variable called HPSS_CREDENTIAL with your job. Site Catalog Example:
<profile namespace="pegasus" key="HPSS_CREDENTIAL" >/path/to/.netrc</profile>
If it is specified, pegasus-transfer copies credential to the default credential location $HOME/.netrc.
If not specified, it makes sure the default credential $HOME/.netrc is available
5.4. Staging Mappers
Starting 4.7 release, Pegasus has support for staging mappers in the nonsharedfs data configuration. The staging mappers determine what sub directory on the staging site a job will be associated with. Before, the introduction of staging mappers, all files associated with the jobs scheduled for a particular site landed in the same directory on the staging site. As a result, for large workflows this could degrade filesystem performance on the staging servers.
To configure the staging mapper, you need to specify the following property
pegasus.dir.staging.mapper <name of the mapper to use>
The following mappers are supported currently, with Hashed being the default .
Flat : This mapper results in Pegasus placing all the job submit files in the staging site directory as determined from the Site Catalog and planner options. This can result in too many files in one directory for large workflows, and was the only option before Pegasus 4.7.0 release.
Hashed : This mapper results in the creation of a deep directory structure rooted at the staging site directory created by the create dir jobs. The binning is at the job level, and not at the file level i.e each job will push out it’s outputs to the same directory on the staging site, independent of the number of output files. To control behavior of this mapper, users can specify the following properties
pegasus.dir.staging.mapper.hashed.levels     the number of directory levels used to accomodate the files. Defaults to 2.
pegasus.dir.staging.mapper.hashed.multiplier the number of files associated with a job in the submit directory. defaults to 5.
Note
The staging mappers are only triggered if pegasus.data.configuration is set to nonsharedfs
5.5. Output Mappers
Starting 4.3 release, Pegasus has support for output mappers, that allow users fine grained control over how the output files on the output site are laid out. By default, Pegasus stages output products to the storage directory specified in the site catalog for the output site. Output mappers allow users finer grained control over where the output files are placed on the output site.
To configure the output mapper, you need to specify the following property
pegasus.dir.storage.mapper <name of the mapper to use>
The following mappers are supported currently
Flat : By default, Pegasus will place the output files in the storage directory specified in the site catalog for the output site.
Fixed : This mapper allows users to specify an externally accesible url to the storage directory in their properties file. To use this mapper, the following property needs to be set.
pegasus.dir.storage.mapper.fixed.url an externally accessible URL to the storage directory on the output site e.g. gsiftp://outputs.isi.edu/shared/outputs
Note: For hierarchal workflows, the above property needs to be set separately for each pegasusWorkflow job, if you want the sub workflow outputs to goto a different directory.
Hashed : This mapper results in the creation of a deep directory structure on the output site, while populating the results. The base directory on the remote end is determined from the site catalog. Depending on the number of files being staged to the remote site a Hashed File Structure is created that ensures that only 256 files reside in one directory. To create this directory structure on the storage site, Pegasus relies on the directory creation feature of the underlying file servers such as theGrid FTP server, which appeared in globus 4.0.x
Replica: This mapper determines the path for an output file on the output site by querying an output replica catalog. The output site is one that is passed on the command line. The output replica catalog can be configured by specifying the following properties.
pegasus.dir.storage.mapper.replica Regex|File
pegasus.dir.storage.mapper.replica.file the RC file at the backend to use
Please note that the output replica catalog ( even though the formats are the same) is logically different from the input replica catalog, where you specify the locations for the input files. You cannot specify the locations for the output files to be used by the mapper in the Abstract Workflow. The format for the File based replica catalog is described here, while for the Regex it is here.
5.5.1. Effect of pegasus.dir.storage.deep
For Flat and Hashed output mappers, the base directory to which the add on component is added is determined by the property pegasus.dir.storage.deep . The output directory on the output site is determined from the site catalog.
If pegasus.dir.storage.deep is set to true, then to this base directory, a relative directory is appended i.e. $storage_base = $base + $relative_directory. The relative directory is computed on the basis of the –relative-dir option. If that is not set, then defaults to the relative submit directory for the workflow ( usually $user/$vogroup/$label/runxxxx ).This is the base directory that is passed to the storage mappers.
5.6. Data Cleanup
When executing large workflows, users often may run out of diskspace on the remote clusters / staging site. Pegasus provides a couple of ways of enabling automated data cleanup on the staging site ( i.e the scratch space used by the workflows). This is achieved by adding data cleanup jobs to the executable workflow that the Pegasus Mapper generates. These cleanup jobs are responsible for removing files and directories during the workflow execution. To enable data cleanup you can pass the –cleanup option to pegasus-plan . The value passed decides the cleanup strategy implemented
none disables cleanup altogether. The planner does not add any cleanup jobs in the executable workflow whatsoever.
leaf the planner adds a leaf cleanup node per staging site that removes the directory created by the create dir job in the workflow
inplace the mapper adds cleanup nodes per level of the workflow in addition to leaf cleanup nodes. The nodes remove files no longer required during execution. For example, an added cleanup node will remove input files for a particular compute job after the job has finished successfully. Starting 4.8.0 release, the number of cleanup nodes created by this algorithm on a particular level, is dictated by the number of nodes it encounters on a level of the workflow.
constraint the mapper adds cleanup nodes to constraint the amount of storage space used by a workflow, in addition to leaf cleanup nodes. The nodes remove files no longer required during execution. The added cleanup node guarantees limits on disk usage. File sizes are read from the size flag in the Abstract Workflow, or from a CSV file (pegasus.file.cleanup.constraint.csv).
Note
For large workflows with lots of files, the inplace strategy may take a long time as the algorithm works at a per file level to figure out when it is safe to remove a file.
Behaviour of the cleanup strategies implemented in the Pegasus Mapper can be controlled by properties described here.
5.6.1. Data Cleanup in Hierarchical Workflows
By default, for hierarchical workflows the inplace cleanup is always turned off. However, you can enable cleanup for your workflows if either of the following two conditions hold true
you have no data dependencies across the pegasusWorkflow jobs, OR
if you have data dependencies between two pegasusWorkflow jobs, they are explicitly tracked by enumerating them as inputs and outputs when defining the pegasusWorkflow jobs
AND
you can set the property
pegasus.file.cleanup.scope deferred
This will result in cleanup option to be picked up from the arguments for the pegasusWorkflow job in the top level Abstract Workflow .
Before the 5.0.1 release, you could only enable inplace cleanup for your hierarchical workflows if there were no data dependencies between pegasusWorkflow jobs.
5.7. Metadata
Pegasus allows users to associate metadata with the following:
Workflow
Job
Transformation
TransformationSite
File
Metadata is specified as a key value pair, where both key and values are of type String.
All the metadata (both user specified and auto-generated) gets populated into the workflow database (usually in the workflow submit directory) by pegasus-monitord. The metadata in this database can be be queried using the pegasus-metadata command line tool and is also shown in the Pegasus Dashboard.
5.7.1. Adding Metadata
The following snippets illustrates how metadata can be added to the various components mentioned above using the Python API, and also shows the resulting generated YAML.
5.7.1.1. Replica Catalog
f = File(lfn="file.txt").add_metadata(creator="ryan")
rc = ReplicaCatalog()
rc.add_replica(
   site="local",
   lfn=f,
   pfn="/inputs/file.txt",
   metadata={"more": "data"}
)
x-pegasus:
  apiLang: python
  createdBy: ryantanaka
  createdOn: 09-29-20T17:02:28Z
pegasus: '5.0'
replicas:
  - lfn: file.txt
    pfns:
      - site: local
        pfn: /inputs/file.txt
    metadata:
     more: data
     creator: ryan
5.7.1.2. Transformation Catalog
process = Transformation(name="process.sh")

# add transformation level metadata
process.add_metadata(step="data processing")

process_site = TransformationSite(
   name="local", pfn="/usr/local/bin/process.sh", is_stageable=True
)

# add transformation site level metadata
process_site.add_metadata(last_updated="1601425319")
process.add_sites(process_site)
x-pegasus:
  apiLang: python
  createdBy: ryantanaka
  createdOn: 09-29-20T17:22:44Z
pegasus: '5.0'
transformations:
  - name: process.sh
    sites:
      - name: local
        pfn: /usr/local/bin/process.sh
        type: stageable
        metadata:
          last_updated: '1601425319'
    metadata:
      step: data processing
5.7.1.3. Workflow
wf = Workflow(name="example")
wf.add_metadata(creates="example output")

j = Job(transformation="process")
j.add_metadata(purpose="process data")

in_file = File("in_file.txt")
in_file.add_metadata(creator="ryan")

j.add_inputs(in_file)
wf.add_jobs(j)
x-pegasus:
  apiLang: python
  createdBy: ryantanaka
  createdOn: 09-29-20T17:42:23Z
pegasus: '5.0'
name: example
metadata:
  creates: example output
jobs:
  - type: job
    name: process
    id: ID0000001
    arguments: []
    uses:
      - lfn: in_file.txt
        metadata:
          creator: ryan
        type: input
    metadata:
      purpose: process data
jobDependencies: []
Note
When the transformation that a job uses has metadata associated with it, that metadata also gets associated with the job. This is similar to how profiles are handled with transformations and jobs.
5.7.2. Automatically Generated Metadata attributes
Pegasus captures certain metadata attributes as output files are generated and associates them at the file level in the database. Currently, the following attributes for the output files are automatically captured from the kickstart record and stored in the workflow database.
pfn - the physical file location
ctime - creation time
size - size of the file in bytes
user - the linux user as who the process ran that generated the output file.
Note
The automatic collection of the metadata attributes for output files
is only triggered if the output file is marked to be registered in
the replica catalog, and --output-site option to pegasus-plan is
specified.
5.7.3. Tracing Metadata For an Output File
The command line client pegasus-metadata allows a user to trace all the metadata associated with the file. The client will display metadata for the output file, the task that generated the file, the workflow which contains the task, and the root workflow which contains the task. Below is a sample illustration of it.
$ pegasus-metadata file --file-name f.d --trace /path/to/submit-dir

Workflow 493dda63-c6d0-4e62-bc36-26e5629449ad
    createdby : Test user
    name      : diamond

Task ID0000004
    size           : 2048
    time           : 60
    transformation : analyze

File f.d
    ctime        : 2016-01-20T19:02:14-08:00
    final_output : true
    size         : 582
    user         : bamboo
5.8. Integrity Checking
Pegasus adds checksum computation and integrity checking steps for non shared filesystem deployments (nonsharedfs and condorio). The main motivation to do this is to ensure that any data transferred for a workflow does not get inadvertently corrupted during data transfers performed during workflow execution, or at rest at a staging site. Users now have options to specify sha256 checksums for the input files in the replica catalog. If checksums are not provided, then Pegasus will compute the checksums for the files during data transfers, and enforce these checksums whenever a PegasusLite job starts on a remote node. The checksums for outputs created by user executable are generated and published by pegasus-kickstartin it’s provenance record. The kickstart output is brought back to the submit host as part of the job standard output using in-built HTCondor file transfer mechanisms. The generated checksums are then populated in the Stampede workflow database.
PegasusLite wrapped jobs invoke pegasus-integrity-check before launching any computational task. pegasus-integrity-check computes checksums on files and compares them against existing checksum values passed to it in its input. We also have extended our transfer tool pegasus-transfer to invoke pegasus-integrity check after completing the transfer of files.
Integrity checks in the workflows are implemented at 3 levels
after the input data has been staged to staging server - pegasus-transfer verifies integrity of the staged files.
before a compute task starts on a remote compute node - This ensures that checksums of the data staged in match the checksums specified in the input replica catalog or the ones computed when that piece of data was generated as part of previous task in the workflow.
after the workflow output data has been transferred to storage servers - This ensures that output data staged to the final location was not corrupted in transit.
The figure below illustrates the points at which integrity checks are implemented. In our approach, the reference checksums for the input files for a job are sent to the remote node where a job executes using in-built HTCondor file transfer mechanism.
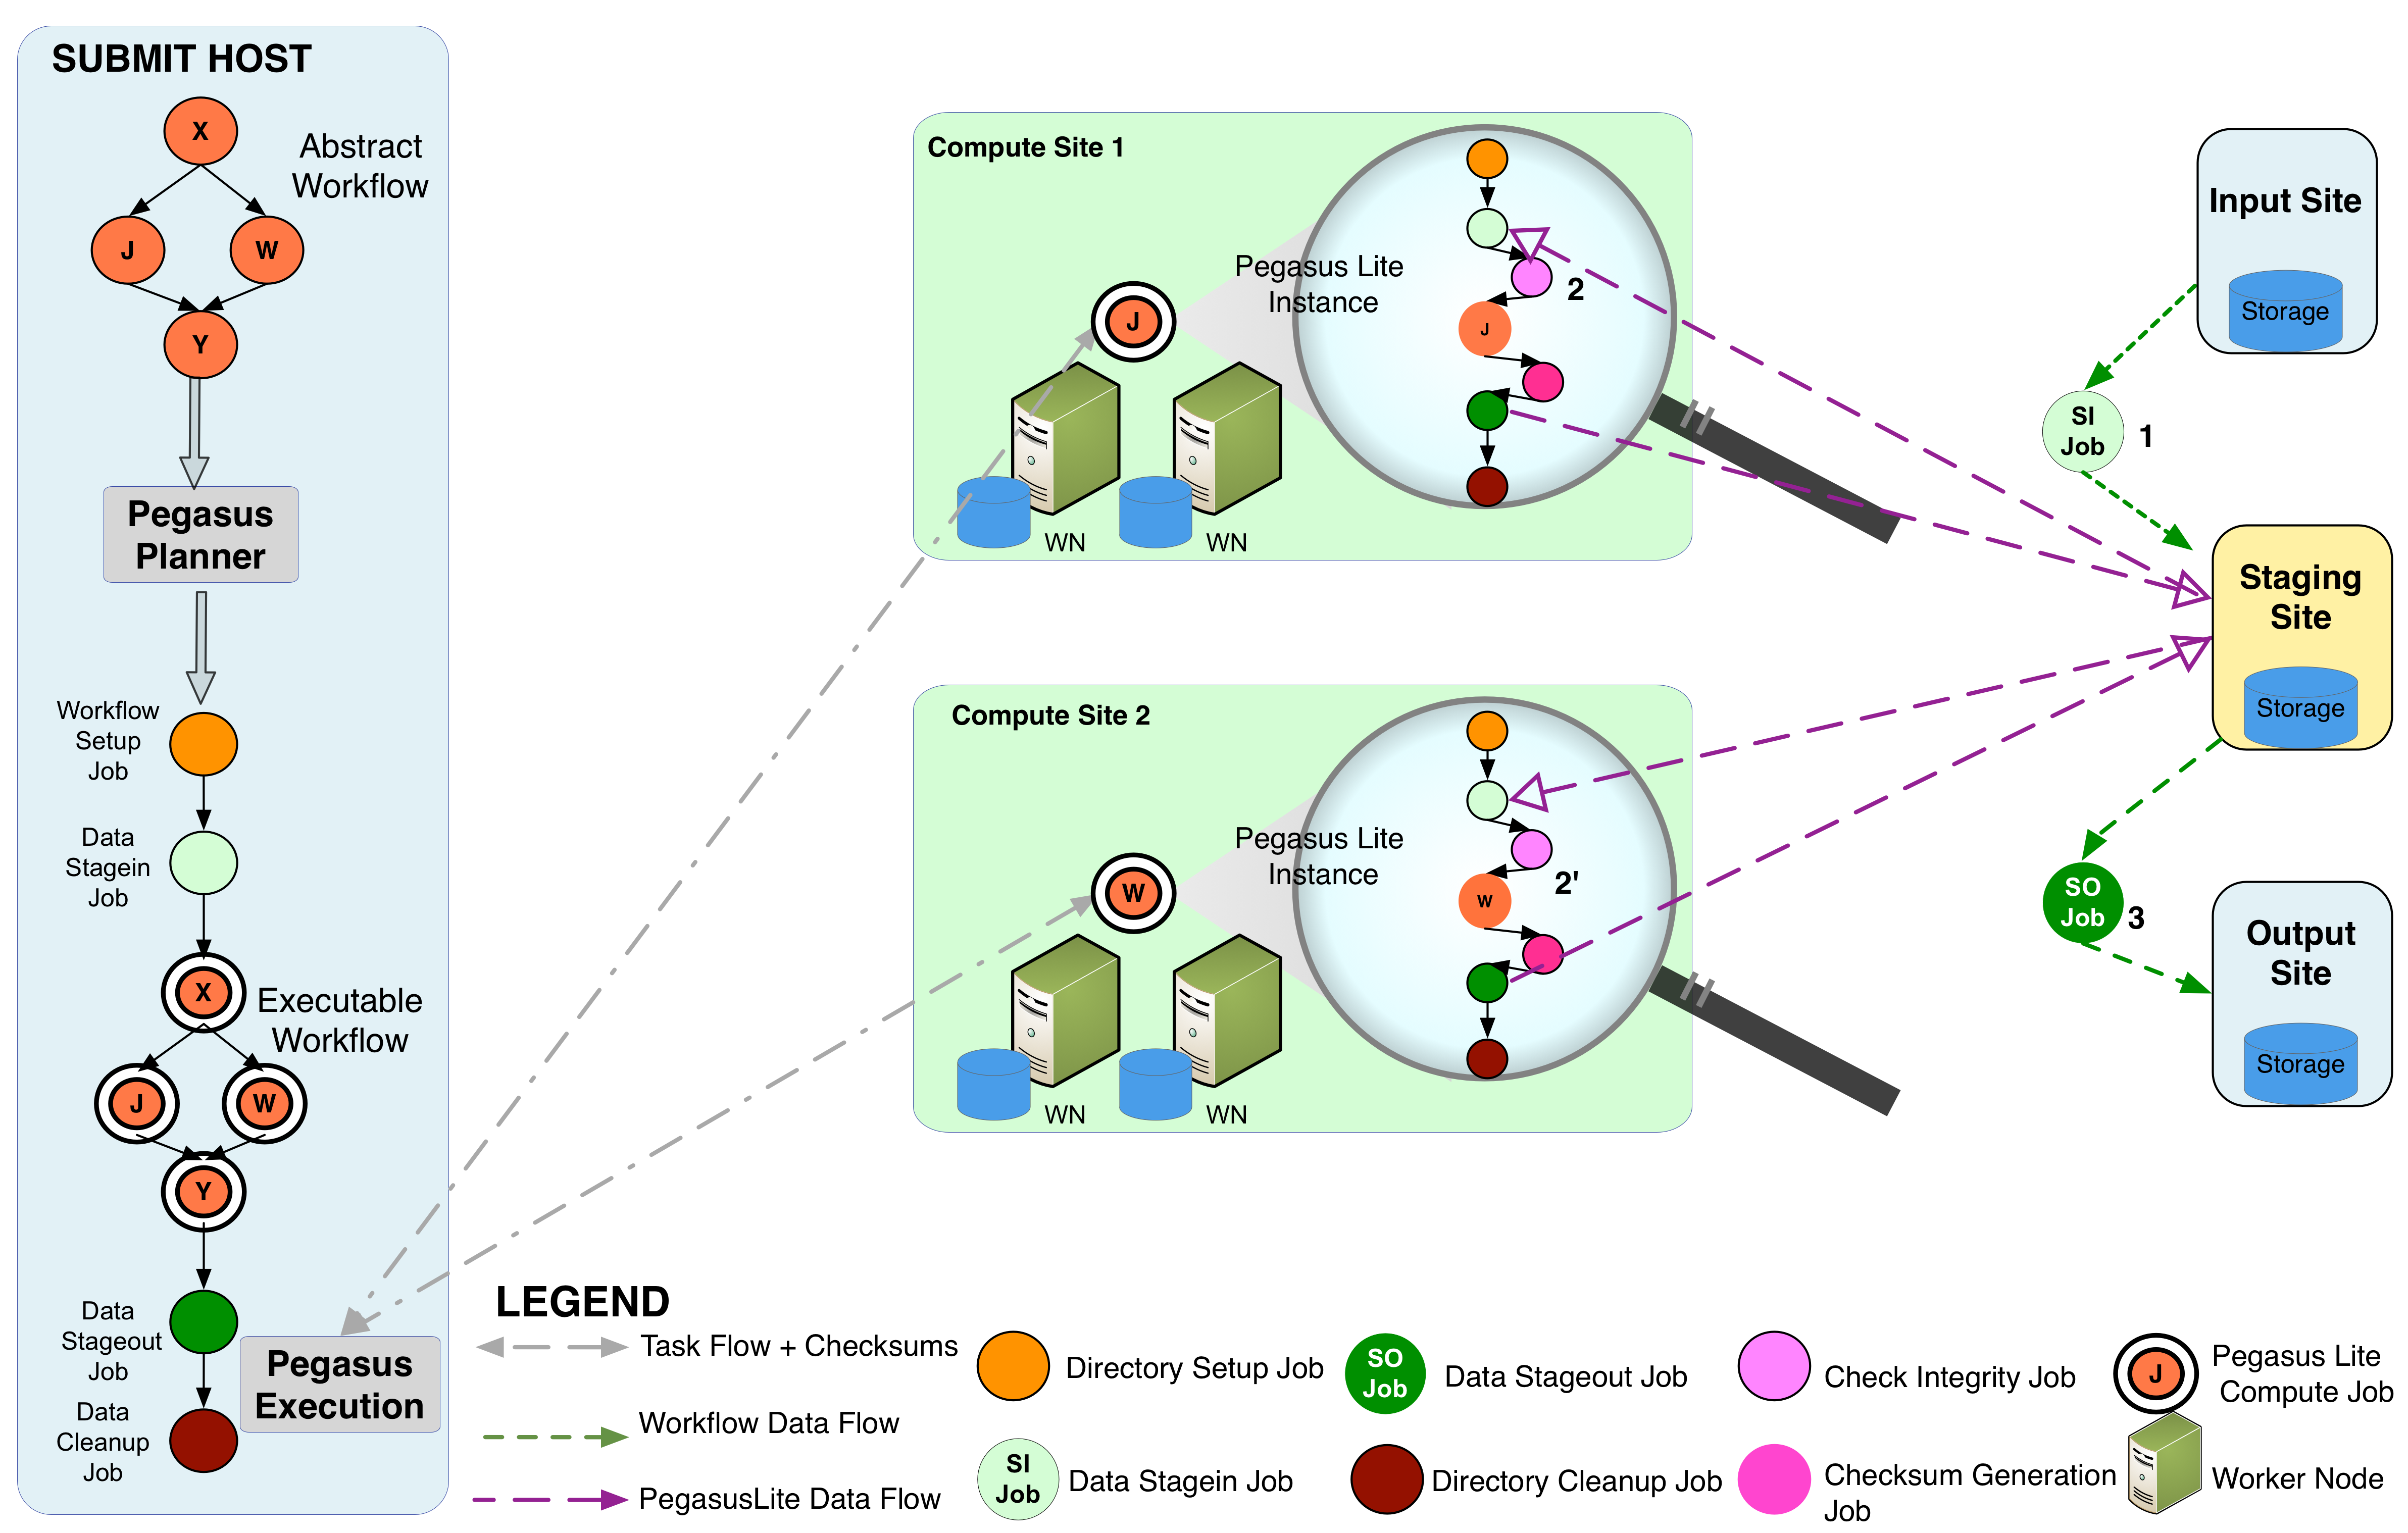
Pegasus Integrity Checking
Currently, there are few scenarios where integrity checks will not happen in case of non shared filesystem deployments
checksums are not enforced for user executables specified in the transformation catalog. In future, we plan to support checksumming for staged executable.
If you have set pegasus.transfer.bypass.input.staging to true to enable the bypass of staging of input files via the staging server, and have not specified the checksums in the replica catalog.
5.8.1. Integrity Checking Statistics
pegasus-statistics now includes a section containing integrity statistics:
# Integrity Metrics
# Number of files for which checksums were compared/computed along with total time spent doing it.
171 files checksums generated with total duration of 8.705 secs

# Integrity Errors
# Total:
#       Total number of integrity errors encountered across all job executions(including retries) of a workflow.
# Failures:
#       Number of failed jobs where the last job instance had integrity errors.
Failures: 0 job failures had integrity errors
5.8.2. Integrity Checking Dials
Currently we support following dials for integrity checking.
none - no integrity checking
full - full integrity checking for non shared filesystem deployments at the 3 levels described in this section.
nosymlink - symlinked files will not be integrity checked
By default integrity checking dial is set to full . To change this you can set the following property
pegasus.integrity.checking none|full|nosymlink
5.8.3. Specifying Checksums in Replica Catalog
For raw input files for your workflow you can specify the checksums along with file locations in the Replica Catalog. Pegasus will check against these checksums when a PegasusLite job starts up on a remote node. If checksums are not specified, then Pegasus will compute them during the data transfer to the staging site, and use them.
To specify checksums in replica catalog, you need to specify two additonal attributes with your LFN -> PFN mapping.
checksum.type The checksum type. Currently only type of sha256 is supported
checksum.value The checksum for the file
For example here is how you would specify the checksum for a file in a file based replica catalog
from Pegasus.api import *

infile = File('input.txt')
rc = ReplicaCatalog()\
      .add_replica('local', infile, "http://example.com/pegasus/input/" + infile.lfn,\
                    checksum = {'sha256':'66a42b4be204c824a7533d2c677ff7cc5c44526300ecd6b450602e06128063f9'})\
       .write()

# the Replica Catalog will be written to the default path "./replicas.yml"
pegasus: '5.0'
replicas:
  - lfn: input.txt
    pfns:
      - {site: local, pfn: 'http://example.com/pegasus/input/input.txt'}
    checksum: {sha256: 66a42b4be204c824a7533d2c677ff7cc5c44526300ecd6b450602e06128063f9}
# file-based replica catalog: 2018-10-25T02:10:02.293-07:00
input.txt http://example.com/pegasus/input/input.txt checksum.type="sha256" checksum.value="66a42b4be204c824a7533d2c677ff7cc5c44526300ecd6b450602e06128063f9" site="condorpool"