9. Execution Environments
Pegasus supports a number of execution environments. An execution environment is a setup where jobs from a workflow are running.
9.1. Localhost
In this configuration, Pegasus schedules the jobs to run locally on the submit host. Running locally is a good approach for smaller workflows, testing workflows, and for demonstations such as the Tutorial. Pegasus supports two methods of local execution: local HTCondor pool, and shell planner. The former is preferred as the latter does not support all Pegasus’ features (such as notifications).
Running on a local HTCondor pool is achieved by executing the workflow on site local (–sites local option to pegasus-plan). The site “local” is a reserved site in Pegasus and results in the jobs to run on the submit host in HTCondor universe local. The site catalog can be left very simple in this case:
pegasus: '5.0'
sites:
- name: local
  directories:
  - type: sharedScratch
    path: /tmp/wf/work
    fileServers:
    - url: file:///tmp/wf/work
      operation: all
  - type: localStorage
    path: /tmp/wf/storage
    fileServers:
    - url: file:///tmp/wf/storage
      operation: all
The simplest execution environment does not involve HTCondor. Pegasus is
capable of planning small workflows for local execution using a shell
planner. Please refer to the share/pegasus/examples directory in
your Pegasus installation, the shell planner’s documentation
section, or the tutorials, for details.
9.2. HTCondor Pools
A HTCondor pool is a set of machines that use HTCondor for resource management. A HTCondor pool can be a cluster of dedicated machines or a set of distributively owned machines. Pegasus can generate concrete workflows that can be executed on a HTCondor pool.
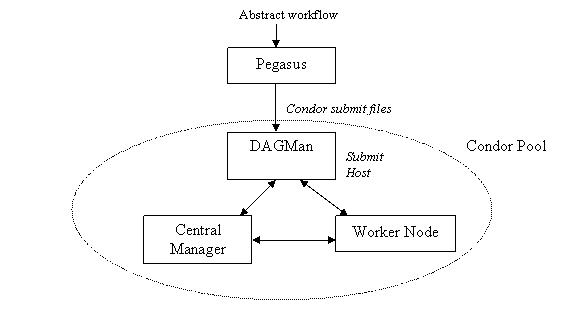
The distributed resources appear to be part of a HTCondor pool.
The workflow is submitted using DAGMan from one of the job submission machines in the HTCondor pool. It is the responsibility of the Central Manager of the pool to match the task in the workflow submitted by DAGMan to the execution machines in the pool. This matching process can be guided by including HTCondor specific attributes in the submit files of the tasks. If the user wants to execute the workflow on the execution machines (worker nodes) in a HTCondor pool, there should be a resource defined in the sites catalog which represents these execution machines. The universe attribute of the resource should be vanilla. There can be multiple resources associated with a single HTCondor pool, where each resource identifies a subset of machine (worker nodes) in the pool.
When running on a HTCondor pool, the user has to decide how Pegasus
should transfer data. Please see Data Staging Configuration
for the options. The
easiest is to use condorio as that mode does not require any extra
setup - HTCondor will do the transfers using the existing HTCondor
daemons. For an example of this mode see the example workflow in
share/pegasus/examples/condor-blackdiamond-condorio/ . In HTCondorIO
mode, the site catalog for the execution site is very simple as storage
is provided by HTCondor:
pegasus: '5.0'
sites:
- name: local
  directories:
  - type: sharedScratch
    path: /tmp/wf/work
    fileServers:
    - url: file:///tmp/wf/work
      operation: all
  - type: localStorage
    path: /tmp/wf/storage
    fileServers:
    - url: file:///tmp/wf/storage
      operation: all
- name: condorpool
  directories: []
  profiles:
    pegasus:
      style: condor
    condor:
      universe: vanilla
There is a set of HTCondor profiles which are used commonly when running Pegasus workflows. You may have to set some or all of these depending on the setup of the HTCondor pool:
- name: condorpool
  directories: []
  profiles:
    pegasus:
      # Change the style to HTCondor for jobs to be executed in the HTCondor Pool.
      # By default, Pegasus creates jobs suitable for grid execution.
      style: condor
    condor:
      # Change the universe to vanilla to make the jobs go to remote compute node.
      # The default is local which will only run jobs on the submit host.
      universe: vanilla

      # The requirements expression allows you to limit where your jobs go
      requirements: (Target.FileSystemDomain != "yggdrasil.isi.edu")

      # The following two profiles force HTCondor to always transfer files.
      # This has to be used if the pool does not have a shared filesystem.
      # By default Pegasus enables these
      should_transfer_files: 'YES'
      when_to_transfer_output: ON_EXIT
9.2.1. Glideins
In this section we describe how machines from different administrative domains and supercomputing centers can be dynamically added to a HTCondor pool for certain timeframe. These machines join the HTCondor pool temporarily and can be used to execute jobs in a non preemptive manner. This functionality is achieved using a HTCondor feature called glideins (see http://cs.wisc.edu/condor/glidein) . The startd daemon is the HTCondor daemon which provides the compute slots and runs the jobs. In the glidein case, the submit machine is usually a static machine and the glideins are told configued to report to that submit machine. The glideins can be submitted to any type of resource: a GRAM enabled cluster, a campus cluster, a cloud environment such as Amazon AWS, or even another HTCondor cluster.
Tip
As glideins are usually coming from different compute resource, and/or the glideins are running in an administrative domain different from the submit node, there is usually no shared filesystem available. Thus the most common data staging modes are condorio and nonsharedfs .
GlideinWMS is a tool and host environment used mostly on the Open Science Grid.
Glideins can also be created by hand or scripts. This is a useful solution for example for cluster which have no external job submit mechanisms or do not allow outside networking.
9.2.2. CondorC
Using HTCondorC users can submit workflows to remote HTCondor pools. HTCondorC is a HTCondor specific solution for remote submission that does not involve setting up a GRAM on the headnode. To enable HTCondorC submission to a site, user needs to associate pegasus profile key named style with value as condorc. In case, the remote HTCondor pool does not have a shared filesytem between the nodes making up the pool, users should use pegasus in the HTCondorIO data configuration. In this mode, all the data is staged to the remote node in the HTCondor pool using HTCondor File transfers and is executed using PegasusLite.
A sample site catalog for submission to a HTCondorC enabled site is listed below
pegasus: '5.0'
sites:
- name: local
  directories:
  - type: sharedScratch
    path: /tmp/wf/work
    fileServers:
    - url: file:///tmp/wf/work
      operation: all
  - type: localStorage
    path: /tmp/wf/storage
    fileServers:
    - url: file:///tmp/wf/storage
      operation: all
- name: condorcpool
  directories: []
  # The grid gateway entries are used to designate
  # the remote schedd for the HTCondorC pool
  grids:
  - type: condor
    contact: ccg-condorctest.isi.edu
    scheduler: condor
    jobtype: compute
  - type: condor
    contact: ccg-condorctest.isi.edu
    scheduler: condor
    jobtype: auxillary
  profiles:
    pegasus:
      # Enable submission using HTCondorc
      style: condorc
    condor:
      # Specify which HTCondor collector to use.
      # If not specified, it defaults to remote schedd specified in grid gateway.
      condor_collector: condorc-collector.isi.edu
      should_transfer_files: 'YES'
      when_to_transfer_output: ON_EXIT
      universe: vanilla
    env:
      PEGASUS_HOME: /usr
To enable PegasusLite in HTCondorIO mode, users should set the following in their properties
# pegasus properties
pegasus.data.configuration    condorio
9.2.3. Open Science Grid Using glideinWMS
glideinWMS is a glidein system widely used on Open Science Grid. Running on top of glideinWMS is like running on a condor pool without a shared filesystem.
9.3. HPC Clusters
9.3.1. Submitting to Slurm, PBS, …
9.3.1.1. Goal
This section describes the configuration required for Pegasus to use HTCondor’s batch type to submit to Slurm, PBS, LSF or SGE batch systems. A HTCondor scheduler daemon will run on a cluster login node and hand of jobs to the batch scheduler.
9.3.1.2. Overview
The main requirement is that HTCondor and Pegasus need to be installed on one of the cluster login nodes so that it can interact with the local batch scheduler using the standard command line tools.
Note
Glite is the old name for BLAH (or BLAHP). BLAH binaries are distributed with HTCondor as the “batch_gahp”. For historical reasons, we often use the term “glite”, and you will see “glite” and “batch_gahp” references in HTCondor, but all of them refer to the same thing, which has been renamed BLAH.
This guide covers Slurm, PBS, Moab, and SGE, but glite also works with other PBS-like batch systems, including LSF, Cobalt and others. If you need help configuring Pegasus and HTCondor to work with one of these systems, please contact pegasus-support@isi.edu.
9.3.1.3. Example Installation on a RHEL 7 Login Node
To provide an idea of what needs to be installed and configured, here are the steps for a RHEL 7 based login node. First install HTCondor and Pegasus, and configure HTCondor to only run the scheduler.
You also need to modifiy the HTCondor glite installation that
will be used to submit jobs to the local scheduler. To do this, run the
pegasus-configure-glite command. This command will install all the
required scripts to map Pegasus profiles to batch-system specific job
attributes.
Example:
$ wget https://research.cs.wisc.edu/htcondor/yum/RPM-GPG-KEY-HTCondor
$ rpm --import RPM-GPG-KEY-HTCondor
$ cd /etc/yum.repos.d
$ wget https://research.cs.wisc.edu/htcondor/yum/repo.d/htcondor-stable-rhel7.repo
$ yum install condor condor-externals
$ echo "DAEMON_LIST = MASTER, SCHEDD" >>/etc/condor/config.d/50-main.config
$ systemctl start condor
$ systemctl enable condor
$ wget -O /etc/yum.repos.d/pegasus.repo http://download.pegasus.isi.edu/wms/download/rhel/7/pegasus.repo
$ yum install pegasus
$ pegasus-configure-glite
Once done, you can verify that HTcondor is enabled by running
condor_q, which should return an empty queue and no errors.
9.3.1.4. Configuring Workflows for Glite
In order to configure a workflow to use glite you need to create an entry in your site catalog for the cluster and set the following profiles:
pegasus profile style with value set to glite.
condor profile grid_resource with value set to batch slurm, batch pbs, batch sge or batch moab.
An example site catalog entry for a local glite SLURM site looks like this:
pegasus: '5.0'
sites:
- name: local
  directories:
  - type: sharedScratch
    path: /lfs/shared-scratch/glite-sharedfs-example/work
    fileServers:
    - url: file:///lfs/shared-scratch/glite-sharedfs-example/work
      operation: all
  - type: localStorage
    path: /lfs/local-storage/glite-sharedfs-example/outputs
    fileServers:
    - url: file:///lfs/local-storage/glite-sharedfs-example/outputs
      operation: all
- name: local-slurm
  directories:
  # The following is a shared directory amongst all the nodes in the cluster
  - type: sharedScratch
    path: /lfs/local-slurm/glite-sharedfs-example/shared-scratch
    fileServers:
    - url: file:///lfs/local-slurm/glite-sharedfs-example/shared-scratch
      operation: all
  profiles:
    pegasus:
      style: glite
      queue: normal
      runtime: '3000'
    condor:
      grid_resource: batch slurm
    env:
      PEGASUS_HOME: /lfs/software/pegasus
Internally, Pegasus generates a
+remote_cerequirements expression for an HTCondor glite job based on
the Pegasus profiles associated with the job. This expression is passed
to glite and used by the *_local_submit_attributes.sh scripts
installed by pegasus-configure-glite to generate the correct batch
submit script. An example +remote_cerequirements classad expression
in the HTCondor submit file looks like this:
+remote_cerequirements = JOBNAME=="preprocessj1" && PASSENV==1 && WALLTIME=="01:00:00" && \
 EXTRA_ARGUMENTS=="-N testjob -l walltime=01:23:45 -l nodes=2" && \
 MYENV=="CONDOR_JOBID=$(cluster).$(process),PEGASUS_DAG_JOB_ID=preprocess_j1,PEGASUS_HOME=/usr,PEGASUS_WF_UUID=aae14bc4-b2d1-4189-89ca-ccd99e30464f"
The job name and environment variables are automatically passed through to the remote job.
The following sections document the mapping of Pegasus profiles to batch system job requirements as implemented by Pegasus, HTCondor, and glite.
9.3.1.5. Setting job requirements
The job requirements are constructed based on the following profiles:
Profile Key |
Key in +remote_cerequirements |
SLURM parameter |
PBS Parameter |
SGE Parameter |
Moab Parameter |
Cobalt Parameter |
Description |
|---|---|---|---|---|---|---|---|
pegasus.cores |
CORES |
–ntasks cores |
n/a |
-pe ompi |
n/a |
–proccount cores |
Pegasus uses cores to calculate either nodes or ppn. If cores and ppn are specified, then nodes is computed. If cores and nodes is specified, then ppn is computed. If both nodes and ppn are specified, then cores is ignored. The resulting values for nodes and ppn are used to set the job requirements for PBS and Moab. If neither nodes nor ppn is specified, then no requirements are set in the PBS or Moab submit script. For SGE, how the processes are distributed over nodes depends on how the parallel environment has been configured; it is set to ‘ompi’ by default. |
pegasus.nodes |
NODES |
–nodes nodes |
-l nodes |
n/a |
-l nodes |
-n nodes |
This specifies the number of nodes that the job should use. This is not used for SGE. |
pegasus.ppn |
PROCS |
n/a |
-l ppn |
n/a |
-l ppn |
–mode c[ppn] |
This specifies the number of processors per node that the job should use. This is not used for SGE. |
pegasus.runtime |
WALLTIME |
–time walltime |
-l walltime |
-l h_rt |
-l walltime |
-t walltime |
This specifies the maximum runtime for the job in seconds. It should be an integer value. Pegasus converts it to the “hh:mm:ss” format required by the batch system. The value is rounded up to the next whole minute. |
pegasus.memory |
PER_PROCESS_MEMORY |
–mem memory |
-l pmem |
-l h_vmem |
–mem-per-cpu pmem |
n/a |
This specifies the maximum amount of physical memory used by any process in the job. For example, if the job runs four processes and each requires up to 2 GB (gigabytes) of memory, then this value should be set to “2gb” for PBS and Moab, and “2G” for SGE. The corresponding PBS directive would be “#PBS -l pmem=2gb”. |
pegasus.project |
PROJECT |
–account project_name |
-A project_name |
n/a |
-A project_name |
-A project_name |
Causes the job time to be charged to or associated with a particular project/account. This is not used for SGE. |
pegasus.queue |
QUEUE |
–partition |
-q |
-q |
-q |
This specifies the queue for the job. This profile does not have a corresponding value in |
|
globus.totalmemory |
TOTAL_MEMORY |
–mem memory |
-l mem |
n/a |
-l mem |
n/a |
The total memory that your job requires. It is usually better to just specify the pegasus.memory profile. This is not mapped for SGE. |
pegasus.glite.arguments |
EXTRA_ARGUMENTS |
prefixed by “#SBATCH” |
prefixed by “#PBS” |
prefixed by “#?” |
prefixed by “#MSUB” |
n/a |
This specifies the extra arguments that must appear in the generated submit script for a job. The value of this profile is added to the submit script prefixed by the batch system-specific value. These requirements override any requirements specified using other profiles. This is useful when you want to pass through special options to the underlying batch system. For example, on the USC cluster we use resource properties to specify the network type. If you want to use the Myrinet network, you must specify something like “-l nodes=8:ppn=2:myri”. For infiniband, you would use something like “-l nodes=8:ppn=2:IB”. In that case, both the nodes and ppn profiles would be effectively ignored. |
9.3.1.6. Specifying a remote directory for the job
gLite/blahp does not follow the remote_initialdir or initialdir
classad directives. Therefore, all the jobs that have the glite
style applied don’t have a remote directory specified in the submit
script. Instead, Pegasus uses Kickstart to change to the working
directory when the job is launched on the remote system. For MPI jobs,
which do not use kickstart as a launcher, we recommend using a
wrapper scripts which cd $PEGASUS_SCRATCH_DIR before kicking
of the actual code.
9.3.1.7. A note on Debian/Ubuntu based Glite installs
HTCondor has an issue for the Slurm configuration when running on
Ubuntu systems. Since in Ubuntu, /bin/sh does not link to
bash, the Slurm script will fail when trying to run the
source command. A quick fix to this issue is to force the script
to use bash. In the bls_set_up_local_and_extra_args function
of the blah_common_submit_functions.sh script, which is located
in the same folder as the installation above, only add bash
before $bls_opt_tmp_req_file >> $bls_tmp_file 2> /dev/null line.
9.3.2. ORNL Summit Using Glite
Summit is part of Oak Ridge Leadership Computing Facilities (OLCF) and offers hybrid computing resources (CPUs and GPUs) to scientists since 2018.
In order to submit to Summit, a Summit login node or a system that has access to the Alpine filesystem and the batch scheduler (eg. OLCF’s Kubernetes Deployment), must be used as the submit node. Submission style must be glite and an example site calatog entry looks like this:
pegasus: '5.0'
sites:
- name: local
  directories:
  - type: sharedScratch
    path: /gpfs/alpine/csc355/scratch/csc355_auser/scratch
    fileServers:
    - url: file:///gpfs/alpine/csc355/scratch/csc355_auser/scratch
      operation: all
  - type: localStorage
    path: /gpfs/alpine/csc355/scratch/csc355_auser/outputs
    fileServers:
    - url: file:///gpfs/alpine/csc355/scratch/csc355_auser/outputs
      operation: all
- name: summit
  arch: ppc64le
  os.type: linux
  directories:
  - type: sharedScratch
    path: /gpfs/alpine/csc355/scratch/csc355_auser/summit/scratch
    fileServers:
    - url: file:///gpfs/alpine/csc355/scratch/csc355_auser/summit/scratch
      operation: all
  profiles:
    pegasus:
      style: glite
      queue: batch
      project: CSC355
      nodes: '1'
      runtime: '1800'
      auxillary.local: 'true'
    condor:
      grid_resource: batch lsf
    env:
      PEGASUS_HOME: /gpfs/alpine/csc355/world-shared/binaries/summit/pegasus/stable
pegasus profile style with value set to glite
condor profile grid_resource with value set to batch lsf
pegasus profile queue is mandatory and should be set to batch
pegasus profile runtime is mandatory and should be set in sites or transformation catalog
pegasus profile nodes is mandatory and should be set in sites or transformation catalog
pegasus profile project must be set to the project name your jobs run under
Note
pegasus profile cores is incompatible with Summit’s LSF submissions.
9.4. Remote Clusters
9.4.1. Bosco
Bosco enables HTCondor to submit jobs to remote clusters using SSH, and the glite job translation layer in HTCondor.
The requirements for Bosco is that you have your own submit host. To install Bosco, we recommend that you choose the Bosco Multiuser option as it will enable Bosco for all users the host. However, Pegasus will work fine with a single user installation as well.
We also recommended to have the submit node configured either as a Bosco submit node or a vanilla HTCondor node. You cannot have HTCondor configured both as a Bosco install and a traditional HTCondor submit node at the same time as Bosco will override the traditional HTCondor pool in the user environment.
You will need to configure the glite installed for Bosco
on the remote system for the mapping of Pegasus profiles to local
scheduler job requirements to work. In particular, you will need
to install the slurm_local_submit_attributes.sh script
(equivalent ones exist for PBS, SGE and LSF) in the correct place in the
glite bin directory on the remote cluster, usually in the directory
~/bosco/glite/bin/ . See Setting job requirements for a full list
of available attributes. An example of this file can be found in
/usr/share/pegasus/htcondor/glite/slurm_local_submit_attributes.sh
9.4.1.1. Long Term SSH Connnection against 2FA Clusters (optional)
This is an optional step and should only be considered if the
target cluster is using 2 factor authentication. One solution
to this problen is to maintain a long term ssh channel which
can be reused over and over again by Bosco. Under the
bosco user, create ~/.ssh/config file containing:
ControlPath /tmp/bosco_ssh_control.%r@%h:%p
ControlMaster auto
ControlPersist 2h
Then ssh to the target cluster and authenticate with your 2FA methods. As long as this connection is alive (run in screen/tmux), Bosco can interact with the cluster by connecting over that control master channel, and no additional authentications will be necessary.
9.4.1.2. Configuring Pegasus for Bosco
To tag a site for SSH submission, the following profiles need to be specified for the site in the site catalog:
pegasus profile style with value set to ssh
Specify the service information as grid gateways. This should match what BOSCO provided when the cluster was set up.
An example site catalog entry for a BOSCO site looks like this:
pegasus: '5.0'
sites:
- name: bosco
  # Scratch directory on the cluster.
  directories:
  - type: sharedScratch
    path: /home/rcf-40/vahi/tmp
    fileServers:
    - url: scp://vahi@hpc-pegasus.usc.edu/home/rcf-40/vahi/tmp
      operation: all
  # Specify the service information.
  # This should match what Bosco provided when the cluster was set up.
  grids:
  - type: batch
    contact: vahi@hpc-pegasus.usc.edu
    scheduler: pbs
    jobtype: compute
  - type: batch
    contact: vahi@hpc-pegasus.usc.edu
    scheduler: pbs
    jobtype: auxillary
  profiles:
    pegasus:
      # SSH is the style to use for Bosco SSH submits.
      style: ssh

      # Works around bug in the HTCondor GAHP, that does not
      # set the remote directory
      change.dir: 'true'

      # Job requirements should be specified using Pegasus profiles.
      queue: default
      runtime: '300'
9.4.2. PyGlidein
Glideins (HTCondor pilot jobs) provide an efficient solution for high-throughput workflows. The glideins are submitted to the remote cluster scheduler, and once started up, makes it appear like your HTCondor pool extends into the remote cluster. HTCondor can then schedule the jobs to the remote compute node in the same way it would schedule jobs to local compute nodes.
Some infrastructures, such as Open Science Grid , provide infrastructure level glidein solutions, such as GlideinWMS. Another solution is BOSCO. For some more custom setups, pyglidein from the IceCube project provides a nice framework. The architecture consists on a server on the submit host, which job it is to determining the demand. On the remote resource, the client can be invoked for example via cron, and submits directly to HTCondor, SLURM and PBS schedulers. This makes pyglidein very flexible and works well for example if the resource requires two-factor authentication.
To get started with pyglidein, check out a copy of the Git repository on both your submit host as well as the cluster you want to glidein to. Starting with the submit host, first make sure you have HTCondor configured for PASSWORD authentication. Make a copy of the HTCondor pool password file. You will need it later in the configuration, and it is a binary file, so make sure you cp instead of a copy-and-paste of the file contents.
Follow the installation instructions provided in the PyGlidein repo. Note that you can use virtualenv if you do not want to do a system-wide install:
$ module load python2   (might not be needed on your system)
$ virtualenv pyglidein
New python executable in /home/user/pyglidein/bin/python
Installing setuptools, pip, wheel...done.
$ . pyglidein/bin/activate
$ pip install pyglidein
...
Then, to get the server started:
pyglidein_server --port 22001
By default, the pyglidein server will use all jobs in the system to determine if glideins are needed. If you want user jobs to explicitly let us know they want glideins, you can pass a constraint for the server to use. For example, jobs could have the +WantPSCBridges = True attribute, and then we could start the server with:
pyglidein_server --port 22001 --constraint "'WantPSCBridges == True'"
One the server is running, you can check status by pointing a web browser to it.
The client (running on the cluster you want glideins on), requires a few configuration files and a glidein.tar.gz file containing the HTCondor binaries, our pool password file, and a modified job wrapper script. This glidein.tar.gz file can be created using the provided create_glidein_tarball.py script, but an easier way is using the already prepared tarball from and injecting your pool password file. For example:
$ wget https://download.pegasus.isi.edu/pyglidein/glidein.tar.gz
$ mkdir glidein
$ cd glidein
$ tar xzf ../glidein.tar.gz
$ cp /some/path/to/poolpasswd passwdfile
$ tar czf ../glidein.tar.gz .
$ cd ..
$ rm -rf glidein
You can serve this file over for example http, but as it now contains your pool password, we recommend you copy the glidein.tar.gz to the remote cluster via scp.
Create a configuration file for your glidein. Here is an example for PSC Bridges (other config file examples available under configs/ in the PyGlidein GitHub repo):
[Mode]
debug = True

[Glidein]
address = http://workflow.isi.edu:22001/jsonrpc
site = PSC-Bridges
tarball = /home/rynge/pyglidein-config/glidein.tar.gz

[Cluster]
user = rynge
os = RHEL7
scheduler = slurm
max_idle_jobs = 1
limit_per_submit = 2
walltime_hrs = 48
partitions = RM

[RM]
gpu_only = False
whole_node = True
whole_node_memory = 120000
whole_node_cpus = 28
whole_node_disk = 8000000
whole_node_gpus = 0
partition = RM
group_jobs = False
submit_command = sbatch
running_cmd = squeue -u $USER -t RUNNING -h -p RM | wc -l
idle_cmd = squeue -u $USER -t PENDING -h -p RM | wc -l

[SubmitFile]
filename = submit.slurm
local_dir = $LOCAL
sbatch = #SBATCH
custom_header = #SBATCH -C EGRESS
    #SBATCH --account=ABC123
cvmfs_job_wrapper = False

[StartdLogging]
send_startd_logs = False
url = s3.amazonaws.com
bucket = pyglidein-logging-bridges

[StardChecks]
enable_startd_checks = True

[CustomEnv]
CLUSTER = workflow.isi.edu
This configuration will obviously look different for different clusters. A few things to note:
address is the location of the server we started earlier
tarball is the full path to our custom glidein.tar.gz file we created above.
CLUSTER is the location of your HTCondor central manager. In many cases this is the same host you started the server on. Please note that if you do not set this variable, the glideins will try to register into the IceCube infrastructure.
#SBATCH -C EGRESS is PSC Bridges specific and enables outbound network connectivity from the compute nodes.
#SBATCH –account=ABC123 specifies which allocation to charge the job to. This is a required setting on many, but not all, HPC systems. On PSC Bridges, you can get a list of your allocation by running the projects command, and looking for the Charge ID field.
We also need secrets file. We are not using any remote logging in this example, but the file still has to exist with the following content:
[StartdLogging]
access_key =
secret_key =
At this point we can try our first glidein:
pyglidein_client --config=bridges.config --secrets=secrets
Once we have a seen a successful glidein, we can add the client to the crontab:
# m  h  dom mon dow   command
*/10 *   *   *   *    (cd ~/pyglidein/ && pyglidein_client --config=bridges.config --secrets=secrets) >~/cron-pyglidein.log 2>&1
With this setup, glideins will now appear automatically based on the demand in the local HTCondor queue.
9.4.3. CREAMCE
CREAM is a webservices based job submission front end for remote compute clusters. It can be viewed as a replaced for Globus GRAM and is mainly popular in Europe. It widely used in the Italian Grid.
In order to submit a workflow to compute site using the CREAMCE front end, the user needs to specify the following for the site in their site catalog
pegasus profile style with value set to cream
grid gateway defined for the site with contact attribute set to CREAMCE frontend and scheduler attribute to remote scheduler.
a remote queue can be optionally specified using globus profile queue with value set to queue-name
An example site catalog entry for a creamce site looks as follow in the site catalog
pegasus: '5.0'
sites:
- name: creamce
  # Scratch directory on the cluster.
  directories:
  - type: sharedScratch
    path: /home/virgo034
    fileServers:
    - url: gsiftp://ce01-lcg.cr.cnaf.infn.it/home/virgo034
      operation: all
  grids:
  - type: cream
    contact: https://ce01-lcg.cr.cnaf.infn.it:8443/ce-cream/services/CREAM2
    scheduler: lsf
    jobtype: compute
  - type: cream
    contact: https://ce01-lcg.cr.cnaf.infn.it:8443/ce-cream/services/CREAM2
    scheduler: lsf
    jobtype: auxillary
  profiles:
    pegasus:
      # cream is the style to use for CREAMCE submits.
      style: cream
    globus:
      # The remote queue is picked up from globus profile.
      queue: virgo
    condor:
      # Staring HTCondor 8.0 additional cream attributes
      # can be passed by setting cream_attributes.
      cream_attributes: key1=value1;key2=value2
The pegasus distribution comes with creamce examples in the examples directory. They can be used as a starting point to configure your setup.
Tip
Usually , the CREAMCE frontends accept VOMS generated user proxies using the command voms-proxy-init . Steps on generating a VOMS proxy are listed in the CREAM User Guide here .
9.4.4. SDSC Comet with BOSCO glideins
BOSCO is part of the HTCondor system which allows you to set up a personal pool of resources brought in from a remote cluster. In this section, we describe how to use BOSCO to run glideins (pilot jobs) dynamically on the SDSC Comet cluster. The glideins are submitted based on the demand of the user jobs in the pool.
As your regular user, on the host you want to use as a workflow submit host, download the latest version of HTCondor from the HTCondor Download page. At this point the latest version was 8.5.2 and we downloaded condor-8.5.2-x86_64_RedHat6-stripped.tar.gz. Untar, and run the installer:
$ tar xzf condor-8.5.2-x86_64_RedHat6-stripped.tar.gz
$ cd condor-8.5.2-x86_64_RedHat6-stripped
$ ./bosco_install
...
Created a script you can source to setup your Condor environment
variables. This command must be run each time you log in or may
be placed in your login scripts:
   source /home/$USER/bosco/bosco_setenv
Source the setup file as instructed, run bosco_start, and then test that condor_q and condor_status works.
$ source /home/$USER/bosco/bosco_setenv
$ condor_q

-- Schedd: workflow.iu.xsede.org : 127.0.0.1:11000?...
 ID      OWNER            SUBMITTED     RUN_TIME ST PRI SIZE CMD

0 jobs; 0 completed, 0 removed, 0 idle, 0 running, 0 held, 0 suspended
$ condor_status
Let’s tell BOSCO about our SDSC Comet account:
$ bosco_cluster -a YOUR_SDSC_USERNAME@comet-ln2.sdsc.edu pbs
BOSCO needs a little bit more information to be able to submit the glideins to Comet. Log in to your Comet account via ssh (important - this step has to take place on Comet) and create the ~/bosco/glite/bin/pbs_local_submit_attributes.sh file with the following content. You can find your allocation by running show_accounts and looking at the project column.
echo "#PBS -q compute"
echo "#PBS -l nodes=1:ppn=24"
echo "#PBS -l walltime=24:00:00"
echo "#PBS -A [YOUR_COMET_ALLOCATION]"
Also chmod the file:
$ chmod 755 ~/bosco/glite/bin/pbs_local_submit_attributes.sh
Log out of Comet, and get back into the host and user BOSCO was installed into. We also need to edit a few files on that host. ~/bosco/libexec/campus_factory/share/glidein_jobs/glidein_wrapper.sh has a bug in some versions of HTCondor. Open up the file and make sure the eval line in the beginning is below the unset/export HOME section. If that is not the case, edit the file to look like:
#!/bin/sh

starting_dir="$( cd "$( dirname "${BASH_SOURCE[0]}" )" && pwd )"

# BLAHP does weird things with home directory
unset HOME
export HOME

eval campus_factory_dir=$_campusfactory_CAMPUSFACTORY_LOCATION
If the order of the HOME and eval statements are reversed in your file, change them to look like the above. At the end of ~/bosco/libexec/campus_factory/share/glidein_jobs/glidein_condor_config add:
# dynamic slots
SLOT_TYPE_1 = cpus=100%,disk=100%,swap=100%
SLOT_TYPE_1_PARTITIONABLE = TRUE
NUM_SLOTS = 1
NUM_SLOTS_TYPE_1 = 1
In the file ~/bosco/libexec/campus_factory/share/glidein_jobs/job.submit.template find the line reading:
_condor_NUM_CPUS=1; \
You should now have a functioning BOSCO setup. Submit a Pegasus workflow.
9.5. Cloud (AWS, Google, JetStream, …)
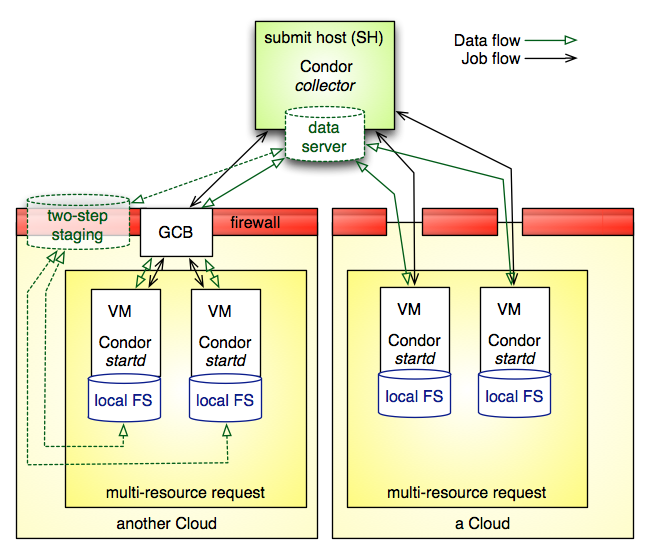
This figure shows a sample environment for executing Pegasus across multiple clouds. At this point, it is up to the user to provision the remote resources with a proper VM image that includes a HTCondor worker that is configured to report back to a HTCondor master, which can be located inside one of the clouds, or outside the cloud.
The submit host is the point where a user submits Pegasus workflows for execution. This site typically runs a HTCondor collector to gather resource announcements, or is part of a larger HTCondor pool that collects these announcements. HTCondor makes the remote resources available to the submit host’s HTCondor installation.
The figure above shows the way Pegasus WMS is deployed in cloud computing resources, ignoring how these resources were provisioned. The provisioning request shows multiple resources per provisioning request.
The initial stage-in and final stage-out of application data into and out of the node set is part of any Pegasus-planned workflow. Several configuration options exist in Pegasus to deal with the dynamics of push and pull of data, and when to stage data. In many use-cases, some form of external access to or from the shared file system that is visible to the application workflow is required to facilitate successful data staging. However, Pegasus is prepared to deal with a set of boundary cases.
The data server in the figure is shown at the submit host. This is not a strict requirement. The data server for consumed data and data products may both be different and external to the submit host, or one of the object storage solution offered by the cloud providers
Once resources begin appearing in the pool managed by the submit machine’s HTCondor collector, the application workflow can be submitted to HTCondor. A HTCondor DAGMan will manage the application workflow execution. Pegasus run-time tools obtain timing-, performance and provenance information as the application workflow is executed. At this point, it is the user’s responsibility to de-provision the allocated resources.
In the figure, the cloud resources on the right side are assumed to have uninhibited outside connectivity. This enables the HTCondor I/O to communicate with the resources. The right side includes a setup where the worker nodes use all private IP, but have out-going connectivity and a NAT router to talk to the internet. The Condor connection broker (CCB) facilitates this setup almost effortlessly.
The left side shows a more difficult setup where the connectivity is fully firewalled without any connectivity except to in-site nodes. In this case, a proxy server process, the generic connection broker (GCB), needs to be set up in the DMZ of the cloud site to facilitate HTCondor I/O between the submit host and worker nodes.
If the cloud supports data storage servers, Pegasus is starting to support workflows that require staging in two steps: Consumed data is first staged to a data server in the remote site’s DMZ, and then a second staging task moves the data from the data server to the worker node where the job runs. For staging out, data needs to be first staged from the job’s worker node to the site’s data server, and possibly from there to another data server external to the site. Pegasus is capable to plan both steps: Normal staging to the site’s data server, and the worker-node staging from and to the site’s data server as part of the job.
9.5.1. Amazon EC2
There are many different ways to set up an execution environment in Amazon EC2. The easiest way is to use a submit machine outside the cloud, and to provision several worker nodes and a file server node in the cloud as shown here:
The submit machine runs Pegasus and a HTCondor master (collector, schedd, negotiator). The workers run a HTCondor startd. And the file server node exports an NFS file system. The startd on the workers is configured to connect to the master running outside the cloud, and the workers also mount the NFS file system.
The site catalog entry for this configuration is similar to what you would create for running on a local with a shared file system.
9.5.2. Google Cloud Platform
Using the Google Cloud Platform is just like any other cloud platform. You can choose to host the central manager / submit host inside the cloud or outside. The compute VMs will have HTCondor installed and configured to join the pool managed by the central manager.
Google Storage is supported using gsutil. First, create a .boto file by running:
gsutil config
Then, use a site catalog which specifies which .boto file to use. You can then use gs:// URLs in your workflow. Example:
pegasus: '5.0'
sites:
- name: local
  directories:
  - type: sharedScratch
    path: /tmp
    fileServers:
    - url: file:///tmp
      operation: all
  profiles:
    env:
      PATH: /opt/gsutil:/usr/bin:/bin
# Compute site
- name: condorpool
  directories: []
  profiles:
    pegasus:
      style: condor
    condor:
      universe: vanilla
# Storage sites have to be in the site catalog, just like a compute site
- name: google_storage
  directories:
  - type: sharedScratch
    path: /my-bucket/scratch
    fileServers:
    - url: gs://my-bucket/scratch
      operation: all
  - type: localStorage
    path: /my-bucket/outputs
    fileServers:
    - url: gs://my-bucket/outputs
      operation: all
  profiles:
    pegasus:
      BOTO_CONFIG: /home/myuser/.boto
9.5.3. Amazon AWS Batch
Unlike the execution environments described in the previous section on Cloud where the user has to start condor workers on the cloud nodes, Amazon provides a managed service called AWS Batch. It automates the notion of provisioning nodes in the cloud, and setting up of a compute environment and a job queue that can submit jobs to those nodes.
Starting 4.9 release, Pegasus has support for executing horizontally clustered jobs on Amazon AWS Batch Service using the command line tool pegasus-aws-batch. In other words, you can get Pegasus to cluster each level of your workflow into a bag of tasks and run those clustered jobs on Amazon Cloud using AWS Batch Service. In upcoming releases, we plan to add support to pegasus-aws-batch to do dependency management that will allow us to execute the whole workflow in a single AWS Batch job.
9.5.3.1. Setup
To use AWS Batch as user you need to do some one time setup to get started at running. Please follow the instructions carefully in this section.
9.5.3.2. Credentials
To use AWS Batch for your workflows, we need two credential files
AWS Credentials File: This is the file that you create and use whenever accessing Amazon EC2 and is located at ~/.aws/credentials. For our purposes we need the following information in that file.
$ cat ~/.aws/credentials
[default]
aws_access_key_id = XXXXXXXXXXXX
aws_secret_access_key = XXXXXXXXXXX
S3 Config File: Pegasus workflows use pegasus-s3 command line tool to stage-in input data required by the tasks to S3 and push data output data generated to S3 when user application code runs. These credentials are specified in ~/.pegasus/credentials.conf . This format of the file is described in the pegasus-s3 manpage. A minimalistic file is illustrated below
$ cat ~/.pegasus/credentials.conf
[amazon]
# end point has to be consistent with the EC2 region you are using. Here we are referring to us-west-2 region.
endpoint = http://s3-us-west-2.amazonaws.com


# Amazon now allows 5TB uploads
max_object_size = 5120
multipart_uploads = True
ranged_downloads = True


[user@amazon]
access_key = XXXXXXXXXXXX
secret_key = XXXXXXXXXXXX
9.5.3.3. Setting up Container Image which your jobs run on
All jobs in AWS Batch are run in a container via the Amazon EC2 container service. The Amazon EC2 container service does not give control over the docker run command for a container. Hence, Pegasus runs jobs on container that is based on the Amazon Fetch and Run Example . This container image allows us to fetch user executables automatically from S3. All container images referred used for Pegasus workflows must be based on the above example.
Additionally, the Docker file for your container image should include these additional Docker run commands to install the yum packages that Pegasus requires.
RUN yum -y install perl findutils
After you have pushed the Docker image to the Amazon ECR Repository, the image URL for that image you will use later to refer in the job definition to use for your jobs.
9.5.3.4. One time AWS Batch Setup
If you are using AWS Batch for the very first time, then you need to use the Amazon Web console to create a role with your user that will give the AWS Batch services privileges to execute to access other AWS services such as EC2 Container Service , CloudWatchLogs etc. The following roles need to be created
AWS Batch Service IAM Role: For convenience and ease of use make sure you name the role AWSBatchServiceRole , so that you don’t have to make other changes. Complete the procedures listed at AWS Batch Service IAM Role.
Amazon ECS Instance Role: AWS Batch compute environments are populated with Amazon ECS container instances, and they run the Amazon ECS container agent locally. The Amazon ECS container agent makes calls to various AWS APIs on your behalf, so container instances that run the agent require an IAM policy and role for these services to know that the agent belongs to you. Complete the procedures listed at Amazon ECS Instance Role.
IAM Role: Whenever a Pegasus job runs via AWS Batch it needs to fetch data from S3 and push data back to S3. To create this job role follow the instructions at section Create an IAM role in Amazon Fetch and Run Example to create a IAM role named batchJobRole.
Note
batchJobRole should have full write access to S3 i.e have the policy AmazonS3FullAccess attached to it.
Note
It is important that you name the roles as listed above. Else, you will need to update the same job definition, compute environment, and job queue json files that you use to create the various Batch entities.
9.5.3.5. Creation of AWS Batch Entities for your Workflow
AWS Batch has a notion of
Job Definition - job definition is something that allows you to use your container image in Amazon EC2 Repository to run one or many AWS Batch jobs.
Compute Environment- what sort of compute nodes you want your jobs to run on.
Job Queue - the queue that feeds the jobs to a compute environment.
Currently, with Pegasus you can only use one of each for a workflow i.e the same job definition, compute environment and job queue need to be used for all jobs in the workflow.
To create the above entities we recommend you to use pegasus-aws-batchclient . You can start with the sample json files present in share/pegasus/examples/awsbatch-black-nonsharedfs directory.
sample-job-definition.json : Edit the attribute named image and replace it with the ARN of the container image you built for your account
sample-compute-env.json : Edit the attributes subnets and securityGroupIds
Before running the pegasus-aws-batch client make sure your properties file has the following properties
pegasus.aws.region=  [amazon ec2 region]
pegasus.aws.account=[your aws account id - digits]
You can then use pegasus-aws-batch client to generate the job definition, the compute environment and job queue to use.
$ pegasus-aws-batch --conf ./conf/pegasusrc --prefix pegasus-awsbatch-example --create --compute-environment ./conf/sample-compute-env.json --job-definition ./conf/sample-job-definition.json --job-queue ./conf/sample-job-queue.json


..

2018-01-18 15:16:00.771 INFO  [Synch] Created Job Definition
arn:aws:batch:us-west-2:405596411149:job-definition/pegasus-awsbatch-example-job-definition:1
2018-01-18 15:16:07.034 INFO  [Synch] Created Compute Environment
arn:aws:batch:us-west-2:XXXXXXXXXX:compute-environment/pegasus-awsbatch-example-compute-env
2018-01-18 15:16:11.291 INFO  [Synch] Created Job Queue
arn:aws:batch:us-west-2:XXXXXXXXXX:job-queue/pegasus-awsbatch-example-job-queue

2018-01-18 15:16:11.292 INFO  [PegasusAWSBatch] Time taken to execute
is 12.194 seconds
You need to add the ARN’s of created job definition, compute environment and job queue listed in pegasus-aws-batch output to your pegasusrc file
# Properties required to run on AWS Batch

# the amazon region in which you are running workflows
pegasus.aws.region=us-west-2

# your AWS account id ( in digits)
# pegasus.aws.account=XXXXXXXXXX

# ARN of the job definition that you create using pegasus-aws-batch
# pegasus.aws.batch.job_definition=arn:aws:batch:us-west-2:XXXXXXXXXX:job-definition/fetch_and_run

# ARN of the job definition that you create using pegasus-aws-batch
# pegasus.aws.batch.compute_environment=arn:aws:batch:us-west-2:XXXXXXXXXX:compute-environment/pegasus-awsbatch-example-compute-env

# ARN of the job queue that you create using pegasus-aws-batch
# pegasus.aws.batch.job_queue=arn:aws:batch:us-west-2:XXXXXXXXXX:job-queue/pegasus-awsbatch-example-job-queue
9.5.3.6. Site Catalog Entry for AWS Batch
To run jobs on AWS Batch, you need to have an execution site in your site catalog. Here is a sample site catalog to use for running workflows on AWS Batch
pegasus: '5.0'
sites:
- name: local
  directories:
  - type: sharedScratch
    path: /LOCAL/shared-scratch
    fileServers:
    - url: file:///LOCAL/shared-scratch
      operation: all
  - type: localStorage
    path: /LOCAL/shared-storage
    fileServers:
    - url: file:///LOCAL/shared-storage
      operation: all
  profiles:
    env:
      PEGASUS_HOME: /usr/bin
- name: aws-batch
  directories:
  - type: sharedScratch
    path: pegasus-batch-bamboo
    fileServers:
    - url: s3://user@amazon/pegasus-batch-bamboo
      operation: all
  profiles:
    pegasus:
      clusters.num: '1'
      style: condor
9.5.3.7. Properties
Once the whole setup is complete, before running a workflow make sure you have the following properties in your configuration file
# get clustered jobs running  using AWSBatch
pegasus.clusterer.job.aggregator AWSBatch

#cluster even single jobs on a level
pegasus.clusterer.allow.single True


# Properties required to run on AWS Batch

# the amazon region in which you are running workflows
pegasus.aws.region=us-west-2

# your AWS account id ( in digits)
# pegasus.aws.account=XXXXXXXXXX

# ARN of the job definition that you create using pegasus-aws-batch
pegasus.aws.batch.job_definition=pegasus-awsbatch-example-job-definition

# ARN of the job definition that you create using pegasus-aws-batch
pegasus.aws.batch.compute_environment=pegasus-awsbatch-example-compute-env

# ARN of the job queue that you create using pegasus-aws-batch
pegasus.aws.batch.job_queue=pegasus-awsbatch-example-job-queue